Blog Posts
Content Management
Alloy was initially designed around blogging, so it should come as no surprise that that is one of the places where it really excels. In Alloy v3 we've added a whole slew of new features related to blogging.
In this section we'll take a look at the Posts List view, as well as adding and maintaining Blog Posts via the Editor. In addition we have a tutorial video above that walks you through creating and modifying posts with the Editor as well.
Posts List
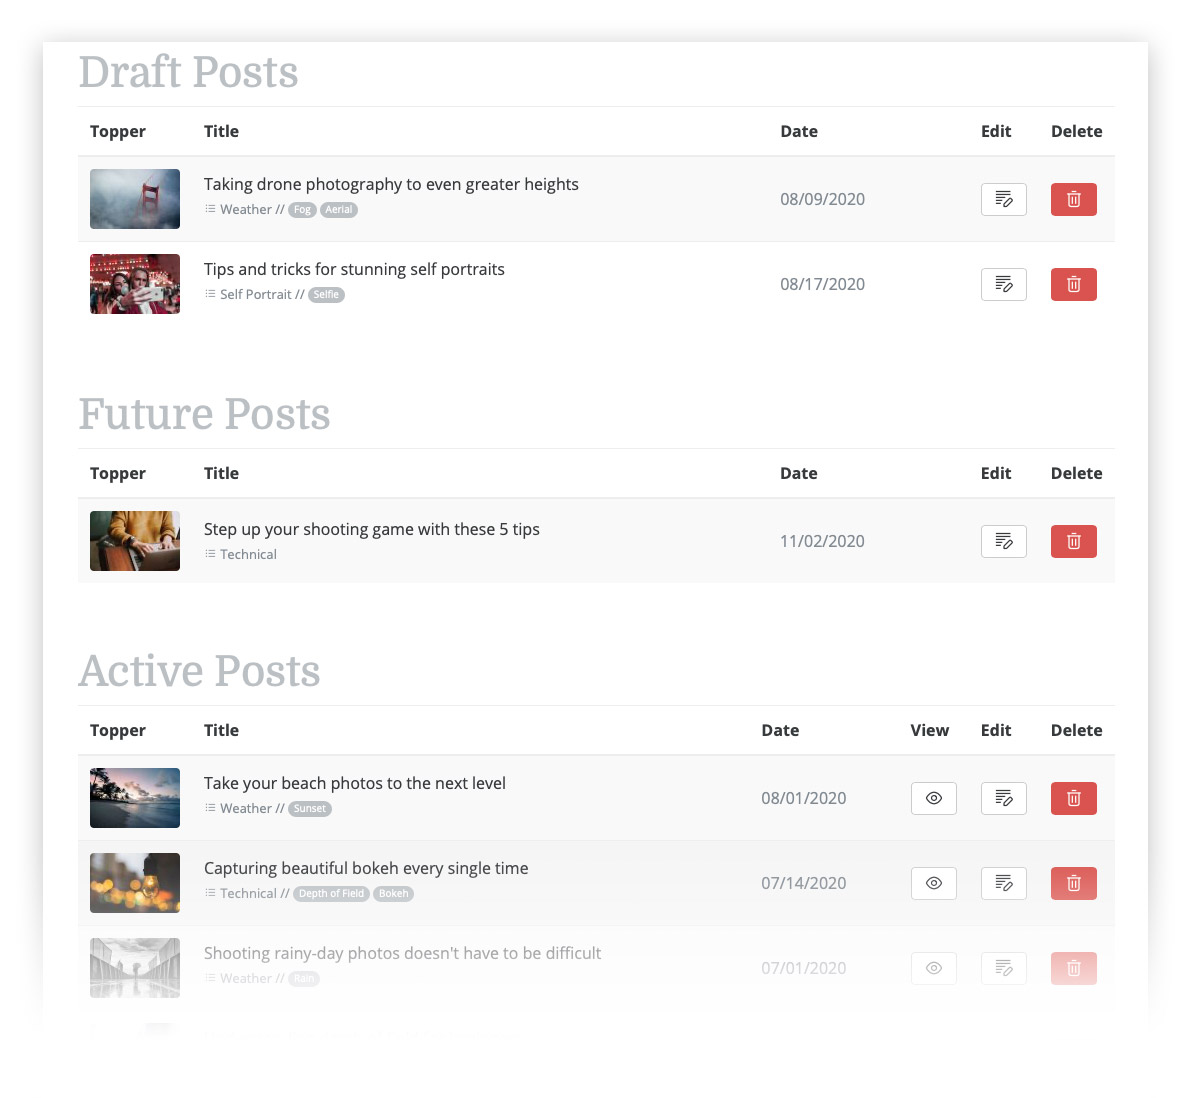
Let's start by looking at the Editor's Posts List view. Below is a screenshot showing the three sections that we can have in our Posts List view -- Drafts, Future and Active.
The Draft and Future sections will be automatically created if you have Posts that are not active. The Future section is created if you have any posts that are time stamped with a future date and time.
The Blog Posts in each of these three section are sorted by their publication date. This includes Future posts as well..
RELATED
Information
Within the Posts List view we're given a bit of information about each post at a glance.
On the left hand side of each post listing we are shown a small thumbnail of our Topper Image. If your post does not have one a filler image is inserted here instead.
Below the title of the post we can see the Category and Tags related to the post. These are optional and can be toggled on and off in the settings for the Editor stack.
We're also shown the publication date of the post. The posts are all sorted by this date, with the newest posts on top.
NEW IN v3
Some of the new features in the Post List view that as of Alloy v3 are:
- Topper Image Thumbnail
- Category Display
- Tags Display

Interacting with Posts
From the Posts List view we can do a few things to our Blog Posts. The Posts List allows us to Add new posts, Edit existing post, Delete, and with Active posts, View the live posts.
Viewing & Deleting
From the Posts List view we can do a few things to our Blog Posts. The Posts List allows us to Add new posts, Edit existing post, Delete, and with Active posts, View the live posts.
The View button is only shown for Active posts, and only if you've linked your Blog page to your Editor in the Editor's stacks settings.
The Delete button does what it describes. When clicked it will prompt you to confirm the deletion of the post. Deleting a post CAN NOT BE UNDONE. Be sure you want to delete a post before confirming.
Adding a New Post
The Posts list page includes an Add New Post button at the top of the page. In addition each individual post in the three sections of the Posts List has an Edit button that allows us to modify the contents of our Blog Posts.
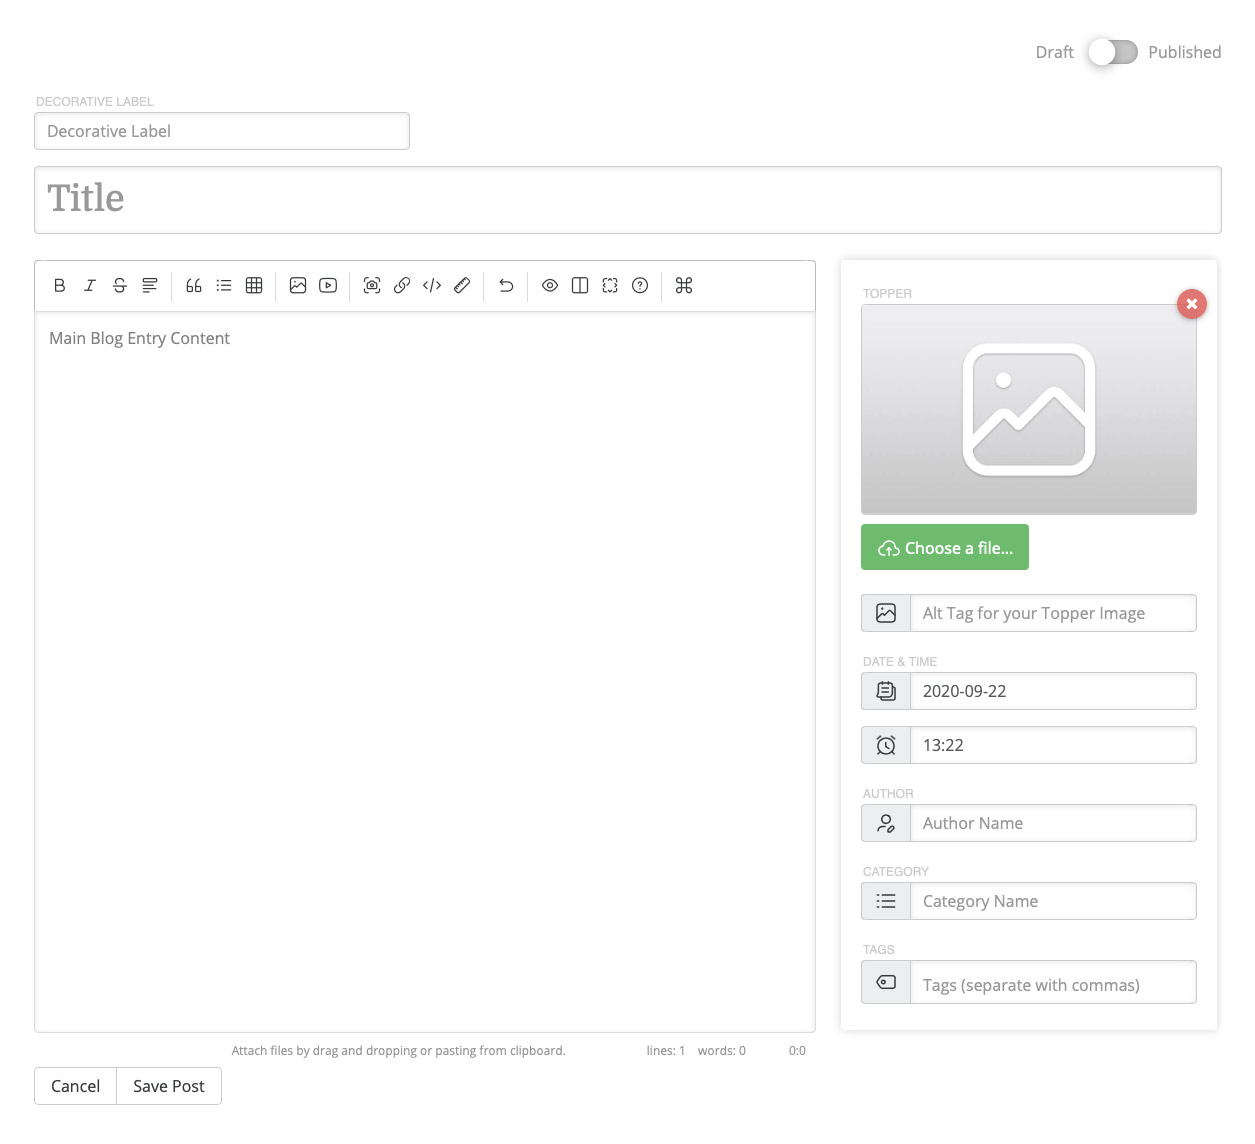
The Blog Post editor provides us a lot of control when creating and editing posts.
Adding & Editing Posts
Adding and editing Blog Posts in Alloy is made easy using the Editor. When adding a new post or editing existing posts you'll be taken to a view like the one above. The Blog Post editor allows us to edit the basics such as the Blog Post Title and Body Text as well as Tags, Date, Author and more.
DRAFT TOGGLE
This toggle allows you to set your Blog Post to be a Draft or Published post. Drafts will not appear on the live blog. The Draft toggle is found in the upper right-hand section of the Blog Post editor.

DECORATIVE LABEL v3
This field allows us to provide a small decorative text label above our Blog Post's title. This can be used as a lead-in or sub-header. If you don't see this field in your Blog Post editor it is likely that it is disabled in the Editor stack's settings in RapidWeaver.
TITLE
This is where we'll thoughtfully craft the title of our Blog Post. This field is required. Our Blog Post's file name, or slug, will be generated based off of this title when we save our post.
EDITING THE SLUG v3
We'll later be able to change the slug name when we edit our Blog Post, but the initial slug will be created based on the Blog Post Title.

The Custom Slug field is only shown when editing existing Blog Posts. To edit a slug first click the lock button to unlock the existing Blog Post's slug.
Something to note about changing the slug name though: If we change the slug name of an older post that has been live on our site for a while we risk that other sites who may have already link to this post will no longer be linked. It is good practice not to change the slug on established posts. A good time to change the slug would be on Draft posts or posts that have not been published for very long.
As of Alloy v3 the Editor stack has an option to make all new Blog Posts Drafts by default. We find this to be good practice. For more information be sure to read the documentation regarding the Editor stack's settings.
CUSTOM SUMMARY v3
We can enable a Custom Summary field within the Editor stack's settings that will allow us to provide custom text for our post's summary. This custom summary will be used in place of the automatically generated summary that Alloy normally produces.
The Custom Summaries field is very similar to the Main Blog Entry Content field, but with a pared down toolbar. This is because the Custom Summary should only contain text for the most part.
While Custom Summaries are great for getting across a specific message for our Summaries View, we encourage you to keep some consistency in how your Custom Summaries are written. Try to aim for the same approximate size summaries for all posts. This will help create a better looking Summaries View for your visitors.

The Editor toolbar provides quick access to Markdown formatting, and more.
MAIN BLOG ENTRY CONTENT
This is where all of the real work happens when it comes to blogging using Alloy. This field will contain the majority of our Blog Post's content. I say the majority because we can create custom summaries now in Alloy v3.
This field, like most of Alloy, is Markdown based. This provides a quick, smooth writing workflow. If you're not familiar with Markdown we provide a Markdown Cheatsheet here on the Alloy site as well as an extensive Markdown reference tool right from the Editor's toolbar.
While the editor uses Markdown for its content, we also offer a powerful toolbar to make things simple and easy for everyone. The toolbar creates the Markdown for you. If you new to Markdown this is a great was to start to learn the basics.
The toolbar allows us to format text, upload images, create YouTube embeds and so much more! It also allows you the ability to preview your post's contents right in the editor. You're also able to write in side-by-side or full-screen mode -- whatever makes things easiest for your workflow.
The toolbar's contents are configurable within the Editor stack's settings in RapidWeaver. Customize what buttons will be seen in the toolbar and republish to get the tools you want.
NEW IN v3
We've added several features to the toolbar and Main Blog Entry Content field in Alloy v3 that we think will make life easier and help you to be more productive. Some of those new additions are:
- Ability to drag-and-drop images directly into the Main Blog Entry Content field
- Ability to use side-by-side editing without going full-screen
- Adds Undo & Redo button options to toolbar
- Includes a prompt box popup when ading links to make Markdown links easier to use
- Includes a prompt box popup when inserting a remote image and not using the Upload Image button
- Adds buttons options for YouTube & Vimeo video embeds
TOPPER IMAGE
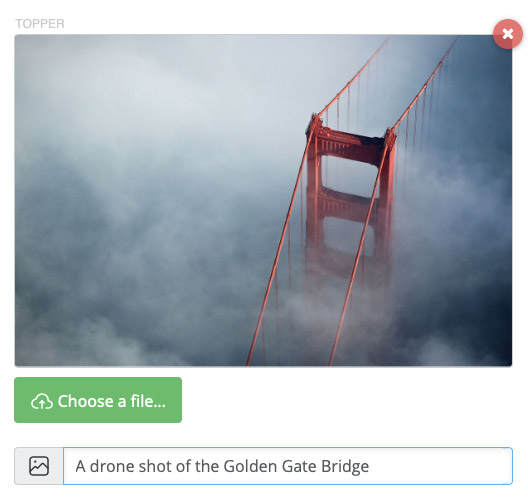
Since the beginning Alloy has offered the ability to add gorgeous Topper Images to each of our Blog Posts. This helps set each post apart and draw our visitor's attention. The Topper Image is used throughout. It is seen in the Summaries View as well as the Full Entry View on the blog itself, as well as used in Search, Category and Tags views as well.
When you upload your Topper Image via the "Choose A File..." button, Alloy also creates a small thumbnail for display in the Posts List within the Editor itself.
Since it is good practice to provide an Alt Tag for our images we also include a field for this just below our Topper Image upload area. This allows you to craft a short description of what the image is about.
And if all of that isn't enough, we've included a Topper Plus stack with Alloy that, when paired with the Conditional stack, allows us to make page banners that feature our posts' Topper Images.
DATE & TIME v3
These two fields allow us to set the Date and Time of our Blog Post. When creating a new post the Date and Time are automatically set to the current date and time. You can modify these to alter where chronologically your post will appear in the blog.
If you set your Blog Post's Date and Time in the future the post will become a Future post. This means that the post, as long as it is not a Draft, will automatically go live on your blog at the specified Date and Time you've selected. This is handy for creating posts now that you'd like to schedule to have automatically publish.
The Date and Time can also be displayed on your Blog Posts for your visitors to see. These can be configured in the Blog Entries stack settings.
AUTHOR
This allows you to add an Author name to the post to show who wrote the Blog Post. If left blank no Author will be added to the post.
Much like the Date and Time you can configure whether or not to show the Author's name with your Blog Posts in the Blog Entries stack's settings.
CATEGORY
This field allows us to categorize out Blog Post. This helps us organize our posts as well as allows our visitors to sort through posts of similar content.
When typing a Category name in this field, the Editor will try and match it to previously used Category names. If one exists you can choose it from the list, or you can continue typing your Category name manually.
The Category display can be configured in the Blog Entries stack settings as well. You can also configure the Editor stack settings to display the Category in the Posts List view as well.

You can have up to 5 different Tags per post.
TAGS
Tags are a sort of sub-category for your Blog Posts. They allow you to break down the categorization of each post more granularly. Allow allows you to provide up to 5 different tags per post.
Much like Author name and Category you can configure whether or not to display them on your Blog Posts in the Blog Entries stack settings. Likewise you can opt to have tags shown with your individual post in the Editor's Posts List view by enabling them in the Editor stack's settings.
