Server Side Caching
Explanation
Alloy allows you to optionally enable a temporary cache of your Blog Posts to help speed up blogs that have an extremely large number of blog posts.
Normally Alloy reads in each blog post when the page loads. This means opening a post file, reading its contents and then closing that file. This happens quite quickly, but if we have thousands of posts this can slow things down some. The Server Side Caching feature allows Alloy to read in all of your blog posts one time and write them to out to a single, temporary cache file on the server. This means we have to open just one file, retrieve our data and then close that file. This cuts out a huge amount of processing that Alloy needs to do.
Should I use Server Side Caching?
Most Alloy users will not need the Server Side Caching feature. If you have a small blog with a few hundred Blog Posts you'll probably not need this caching feature, as Alloy is really quick at loading its blog posts.
If your blog grows though and you find you've now got thousands of Blog Posts you may want to enable caching, as this will help speed things up for you.
Does Server Side Caching work solely with Blog Posts?
This feature's primary use is with Blog Posts, but we have also incorporated it into Alloy's Droplets as well. It is setup and used much the same as with Blog Posts, with the exception that since Droplets do not need an Alloy Control Center on the page the caching is enabled and configured in the Droplets stack instead.
Configuration
Starting Point
We highly recommend watching the tutorial video at the top of this page to learn how to setup and use Alloy's Server Side Caching.
The documentation below simply supports that video, and is meant as a reference when configuring it within your Alloy Control Center, Blog Entries and Droplets stacks.

Alloy Control Center Stack Settings
Enabling Server Side Caching
Since Server Side Caching is optional, and off by default, we'll need to enable it in a few places in order to use it. We need to enable it on both our Blog Page and our Editor page.
This setting, seen here, is found in the Alloy Control Center. We need to enable it for both pages, as well as assign it an ID. This unique ID should match on both the Blog and Editor page.
The unique ID is there to distinguish one blog setup from another for those who run more than one Blog and Editor combination on one server.
This setting is also found in the Droplets stack as well. When enabled in the Droplets stack, the ID should match to the Editor that you're using to edit your Droplets.
More on Unique IDs
If you forget to give a Blog, Editor page, or a Droplet stack the correct ID that links it to its associated other stack(s) then you may end up loading the content from one blog into another. This means it is important that we pay close attention to our Unique IDs and make sure that the Blog and Editor pages that are used with one another have the same IDs and that they do not share IDs with other Blog or Editor pages on our server.
KEEP IT SIMPLE
When creating our Unique IDs be sure to keep them simple and to the point. One word will do. In fact we recommend using just one word, or a compound word. Here are some example of what to do and what not to do:
- blacksmith
- AlloyBlog
- tastyvegantreats
- My Awesome Blog
- Live Long and Prosper
In the Editor

Editor Stack Settings
We connect our Blog and Editor pages together through the use of a Unique ID so that when you add, modify or delete a post in the Editor a new cache can be created.
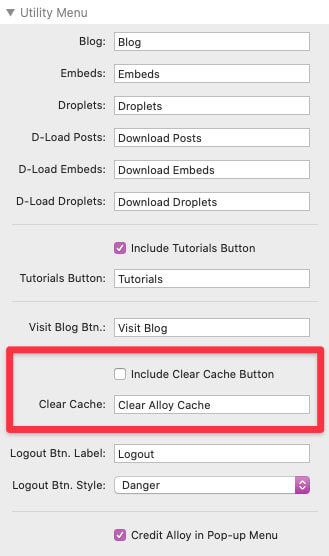
We also do this because we've included a feature in the Editor stack that allows you to manually clear the Server Side Cache if you wish. When enabled, the Clear Cache button is located in the Editor's Utility Menu on your site. To enable it you'll need to turn it on in your Editor stack's settings and republish your Editor page.
This adds the Clear Cache button to the Utility Menu, which allows you to clear the cache any time you might like. While manually clearing the cache should not be necessary most times, it can be helpful if you've accidentally used the wrong Unique ID or had some other configuration problem.

