Droplets v3
Content Management
Alloy's Droplets system allows us to customize aspects of our site directly from the Alloy Editor on our site without needing to republish the project from RapidWeaver.
Droplet's are small pieces of data that we can use to manipulate text or images on a page. With a little forethought we can create Droplets that will let us change Banner images, Headers and more. This page covers how to use the Droplets section of the Editor. In addition we have a tutorial video above that will walk you through using Alloy's Droplets on your site.
Note: To follow along with the tutorial video you'll want to have already setup and published your Editor. This is covered in the Quick Start section of the documentation.
Droplets List
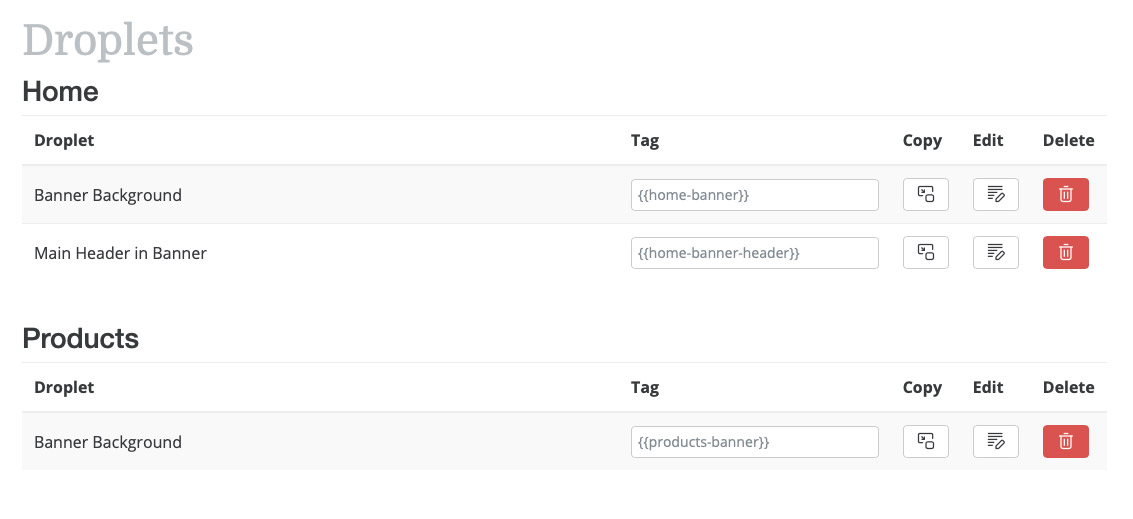
If you've read through the Blog Posts and Embeds documentation pages you'll see a trend here. Much like those two tools, Droplets also has its own list view within the Editor. The Droplets List view gives us access to editing and deleting Droplets, as well as a quick way to copy our Droplet tags for inserting into RapidWeaver.
RELATED

List Sorting
Like Embeds, Droplets are sorted by two criteria -- Firstly they're sorted alphabetically, but in addition they're also put into groups, which we call Pages. These Pages can be named whatever you like however. In fact they don't even need to be the names of pages on your site. You can name them whatever you like to help in your own organization of your Droplets. We'll look at these Pages later on when we look at adding and editing a Droplet. We also discuss Pages in the tutorial video above.
Interacting with Droplets
Each of the items in the Droplets List has an Edit button for that allows to do the most important thing -- Edit the Droplet's content.
The Droplets List also shows us what the Tag is for each Droplet as well as gives us a button we can click to quickly copy that Tag for use in RapidWeaver.
Deleting Droplets
Similarly to Blog Posts and Embeds you can also delete Droplets from via list view. When you click the Delete button it will prompt you to confirm the deletion of the Droplet. Deleting a Droplet CAN NOT BE UNDONE. Be sure you want to delete it before confirming.
Adding & Editing Droplets
While Droplets are extremely simple sounding, as well as easy to configure, they're very powerful. Droplets consist of just a few fields, but can make managing our page's content, and styling our site an easy task.
To get started we have an "Add New Droplet" button in the top right of our Droplets List View that allows us to add a new Droplet to the Editor.
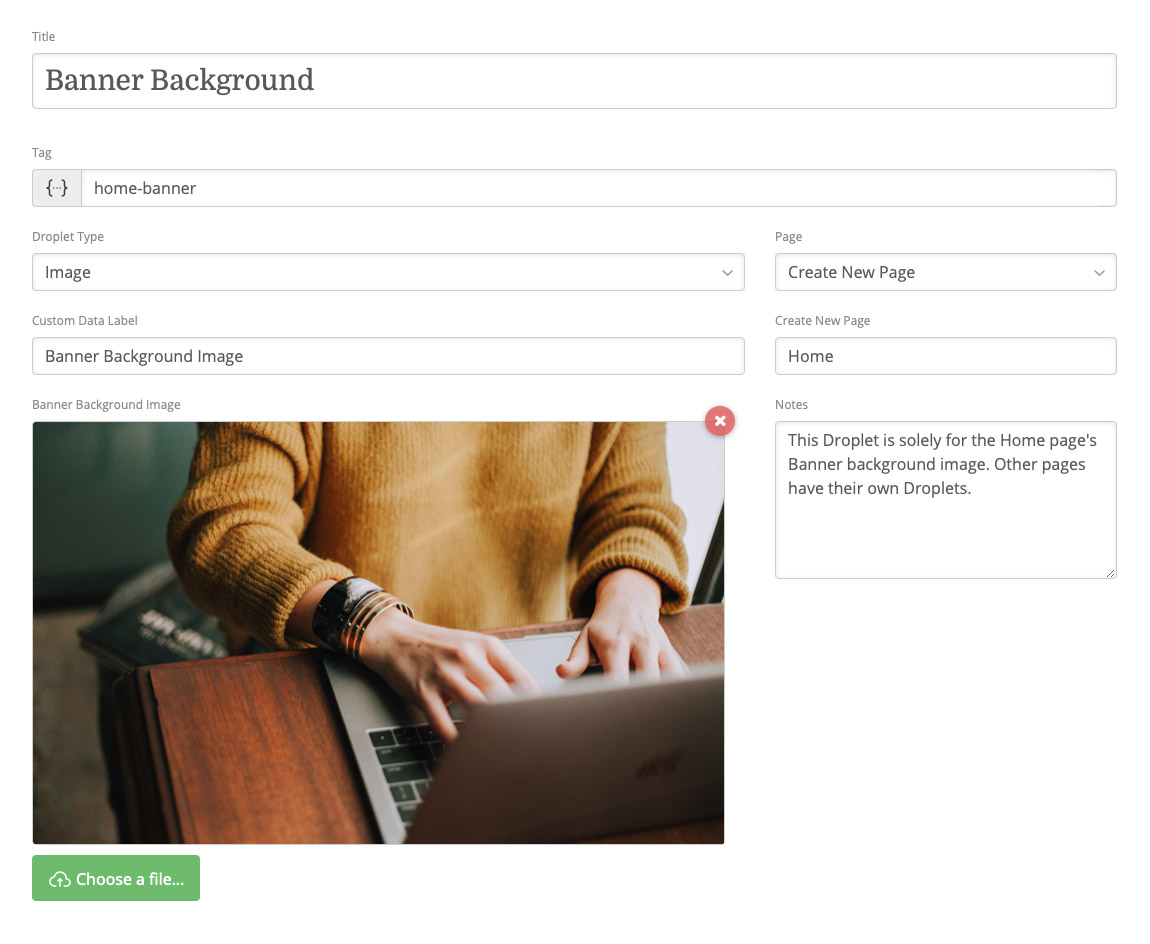
Let's take a look at the fields we'll use to create a Droplet, below. Don't forget we also have a tutorial video above that walks you through creating and managing your Droplets as well.

TITLE
This field is used for our own organizational purposes. This title won't be displayed on our live site with the Droplet's data. It is only meant for use in the Droplets list, so that we know what kind of content is contained within the Droplet.
TAG
This is the magical element in our Droplet. The tag we create here will be inserted into our page so that Alloy's Droplet stack can convert it into our data. Your should be simple. You should not use spaces in your tag name, but instead you can use a dash or underscore in place of a space. We recommend a dash. This tag should also not contain any special characters.
While Droplet Tags do use double-curly braces on the page, we do not, and should not add the braces here. Alloy's Editor will do that for us when it saves your Droplet.
Most importantly -- your Tag name should be unique from ALL other Droplet Tags. This is important for two reasons. Firstly the tag should be unique so that we know what data should be associated with which Tags. Second, the Tag name is what is used for your Droplet's filename when saving your Droplet. If you have duplicate Tag names the new Droplet will overwrite the old one that uses the same Tag name.
We check during the adding of a Droplet to make sure that the Tag name is not already being used and warn you if it is currently in use.

To edit a Droplet Tag first click the lock button to unlock the existing Droplet's filename.
When editing an existing Droplet you'll notice that the Tag name is locked by default (see above). You must click the red lock icon to gain access to changing the Droplet Tag name. The reason behind this is that if you change the Tag name, any existing Droplet tags that you've placed in your RapidWeaver project file will not longer link up with this Droplet's data.
We highly suggest finalizing your Droplet's Tag name before you ever insert that tag into your project file.
DROPLET TYPE
We can choose two different data types for our Droplets -- Text or Image.
Text Droplets are used for replacing text elements on a page using our Droplet Tag -- a header, text within a paragraph, copyright, etc. can all be replaced using our Droplet Tag. We can use these text Droplets for small snippets of text that we need to reuse and that we may want to be able to quickly change site-wide.
Image Droplets allow us to upload an image using the Editor and link the URL for that uploaded image directly to our Droplet Tag. This lets Alloy upload and manage the image for us and we can then use our Droplet Tag for Banner backgrounds, Images and more.
We look at how to use both Droplet Types in the tutorial video at the top of this page.
PAGE
The Page field is yet another organizational tool for the Droplets List view. This allows us to categorize our Droplets so we remember where they show up within our site. By default we call this organizational tool "Pages" but you can use this to sort your Droplets into any sort of category system you like.
When creating a Droplet you can select from an existing Page or select "Create New Page" to make a new Page category. When you select "Create New Page" you'll be given a field to add your page name as well.
CUSTOM DATA LABEL
When we're editing Droplets that we may have created weeks, months or years ago, we want a nice quick reminder of what type of data we're editing. This Custom Data Label will be used to display over the top of our Data field when we're later editing existing Droplets.
TEXT / IMAGE
Depending on the Droplet Type you chose you will be presented here with either a text field or an image picker that allows you to upload an image. This is the main content of our Droplet -- the "data." This is the content that will replace our Tag on the live website page.
Be sure to watch through the tutorial video at the top of the page to see how we can use this "data" in our RapidWeaver project files to allow us to modify our page's content and styling directly from our site without the need to republish the project from RapidWeaver.
NOTES
Like the Custom Data Label, the Note field is there to remind us of how we have used the Droplet on our site. This field is used only within the Editor for our own personal reference.

